Friday, November 29, 2013: pushnot — A Personal Push Notification Server
pushnot is an open source push notification server written in Node.js. You can use it to push notifications to your Mac.
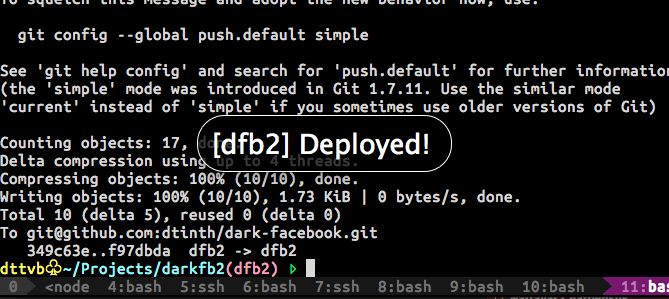
When I push my code, the post-receive hook deploys it, and pushes the notification back to my screen.
Background
When I push code to my GitHub repository, GitHub triggers a Post-Receive WebHook that I set up to compile the code and deploy it.
I want to be notified when the code is successfully deployed.
Apple already has Safari Push Notifications, but to use it, I need to be in their Mac Developer or iOS Developer program.
So I decided to roll my own.
Features
- Send push notifications from your shell scripts, PHP scripts, or whatever.
- Notifications are encrypted using public key.
Overview
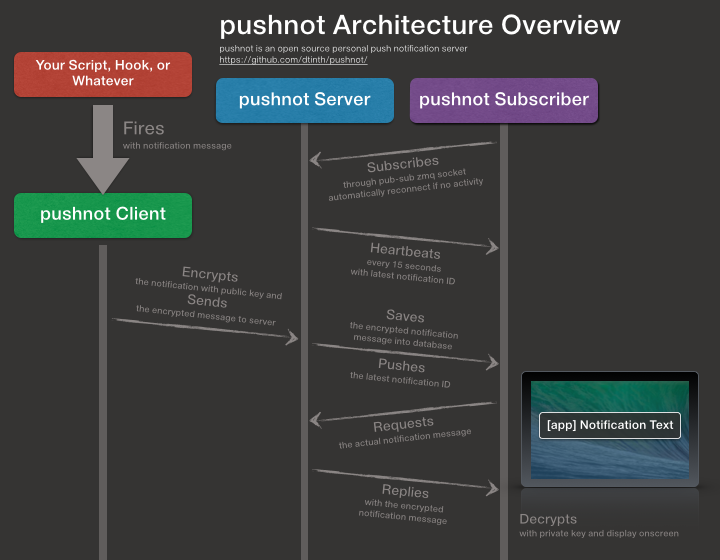
The client sends a notification to the server.
The server pushes it to the subscriber.
The subscriber displays the notification on screen.
Pushnot consists of three major components:
- The server that clients can send a notification to, and subscribers can subscribe to these notifications.
- The client is any application that wants to send a notification to the user.
- The subscriber waits for the server to push the notification and notifys the user.
Prerequisites
First, you need to have a private server to run your personal notification server. I’m using DigitalOcean’s VPS which costs only $5 a month. Installing Node.js on it is straightforward.
On both your personal computer and the server, install:
- Node.js
- zeromq
- On Ubuntu,
apt-get install libzmq-devshould do it. - On Mac OS X, perhaps using Homebrew.
- On Ubuntu,
On your personal computer, install and run:
Public and Private Key Generation
All notifications are encrypted using a public key, and only the user (with the private key) can see that notification.
pushnot requires an RSA key of at least 2048 bit:
openssl genrsa -out ~/.pushnot.pem 2048
openssl rsa -in ~/.pushnot.pem -pubout > ~/.pushnot.pub
Configuration
You need a configuration file to locate the server.
cat > ~/.pushnot.conf.json
{ "server": "your.vps.host", "http": 60001, "zmq": 60002, "key": "some random string" }
- server: This is the IP address or host name of your server.
- http: The port of the HTTP server. You can use 60001.
- zmq: The port of the ZeroMQ server. You can use 60002.
- key: Enter some random string here, which is a shared key to communicate between the client and server.
Server Installation
On server, install pm2.
npm install -g pm2 --unsafe-perm
Copy ~/.pushnot.conf.json and ~/.pushnot.pub to your server.
Clone the project and install dependencies:
git clone https://github.com/dtinth/pushnot.git
cd pushnot
npm install
Link so that you can use the command pushnot anywhere.
npm link
Start the server:
pm2 start pushnot-server.js
Client Installation
Also clone the project, and install dependencies. You can link so that you can send push notifications from your computer too.
git clone https://github.com/dtinth/pushnot.git
cd pushnot
npm install
npm link
Make sure both Zephyros and Growl is running, start the subscriber!
node pushnot-subscriber.js
Let’s send a push notification! From the server, run:
pushnot hello Hello World
You should now see the notification on your computer.
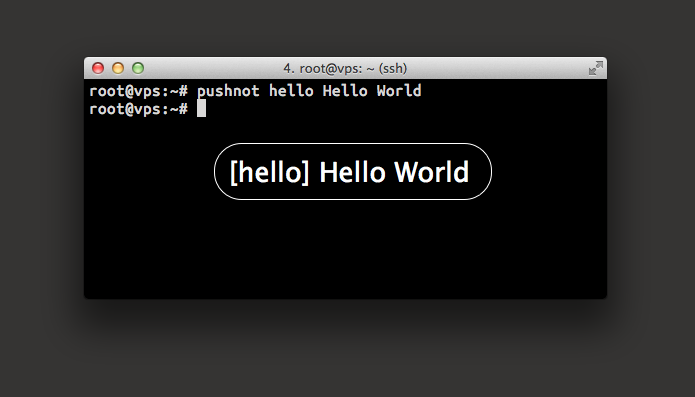
Here comes the notification.
Turn off Growl Display
You should probably see that the notification is displayed both by Zephyros and Growl.
The reason for that is because I like Zephyros’ alert boxes better (you can click through it), but I also want Growl to put the notification in “Growl Notification Rollup” when I am idle.
But displaying two notifications at once seems like a silly idea. That’s why I tell Growl not to display a notification by setting the display style to “No Default Display”
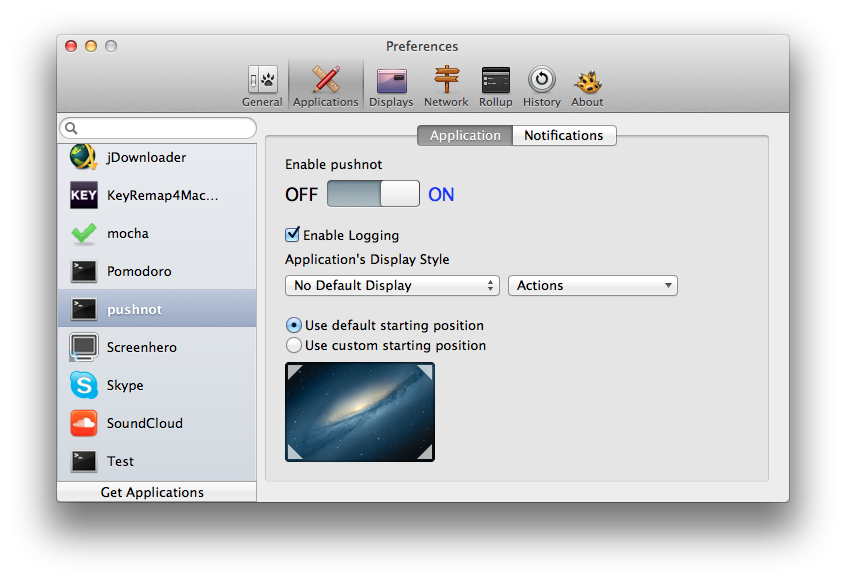
Set the Application's Display Style for pushnot to "No Default Display."
Zephyros Configuration
You’ll see that you need to keep this script running to receive push notifications, but you can configure Zephyros to keep it running!
Go to Zephyros preferences, and set the script to pushnot subscriber:
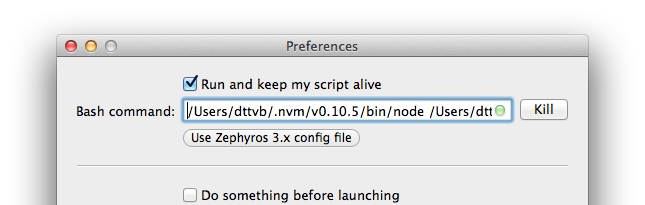
Depending on how you installed node, your command may vary. Here’s mine:
/Users/dttvb/.nvm/v0.10.5/bin/node /Users/dttvb/Projects/pushnot/pushnot-subscriber.js
To determine which command you want to use, make sure you’re in pushnot folder:
echo `which node` `pwd`/pushnot-subscriber.js
Use pushnot in Your Hooks
Now you are free to use pushnot in your post-commit hooks.
For example,
if you just want to notify when someone pushes a commit to your repository,
you can use this hook (written in PHP):
<?php

function truncate($text) {
  $text = trim(preg_replace('~\n.*$~s', '', $text));
  return strlen($text) > 80 ? substr($text, 0, 80) . '...' : $text;
}

$payload = json_decode($_POST['payload']);

$app = $payload->repository->owner->name . ' / ' . $payload->repository->name;
$messages = array('New commit:');

$commits = array_slice(array_reverse($payload->commits), 0, 3);

foreach ($commits as $commit) {
  $commit_message = truncate($commit->message);
  $messages[] = '+ (' . $commit->author->name . ') ' . $commit_message;
}

$message = implode("\n", $messages);
system('pushnot ' . escapeshellarg($app) . ' ' . escapeshellarg($message));
A Wrapper Script
Since I install node inside nvm. It can’t be run by nobody (web server’s PHP process). To make it work I need to use some dirty hack:
/usr/bin/pushnot
#!/bin/bash
export PATH=/root/.nvm/v0.10.22/bin:$PATH
export HOME=/root
echo "sending noti"
/root/.nvm/v0.10.22/bin/pushnot "$@" 2>&1
And make sure to give appropriate permissions to /root and /root/.nvm.
I know it’s dirty, but it works for me.
add / view all comments
Responses